Sunday, 17 November 2013

Crafting a Dekonstruer #1 XCOM: Enemy Unknown


This weekend I found some time that I could take to sit down and bash my keyboard, in hopes of making that XP number rise. Let the face rolling begin!


To kick start this blog we are going to be looking at the strategy game XCOM: Enemy Unknown and breaking it down to its bits and pieces. These game atoms are the core of the game and make it one of my personal favorite strategy games.


Players:
XCOM is primarily a single player game but it still has a separate multiplayer mode where players can try to out play and out think their opponents. Players start off a multiplayer game by first creating a squad that can consist up to six members. With a pool of points use them to create a squad by spending them on soldiers and gear. Once they have created a squad then players take turns commanding their individual squads to defeat their opponents. This type of player interaction pattern would fall under “player vs player”.


XCOM has multiplayer but it is overshadowed by its great single player experience. The single player mode is just that, single player where the player plays against the game system, in order progress though the story and complete the game.

Objectives and Goals:
XCOM is set in the near future during man’s first contact with alien life forms. The player is put in charge of an elite military organization with no tires to any countries. The Goal of XCOM is to protect humanity from its first encounter with aliens while advancing humanity. The main goal of XCOM is outwit and find a solution to humanity’s crises. There are other side goals in XCOM such as research and advance human technology, create and construct new technology with the new research, capture and take back control of aliens landing site and so on.


Rules and Mechanics:
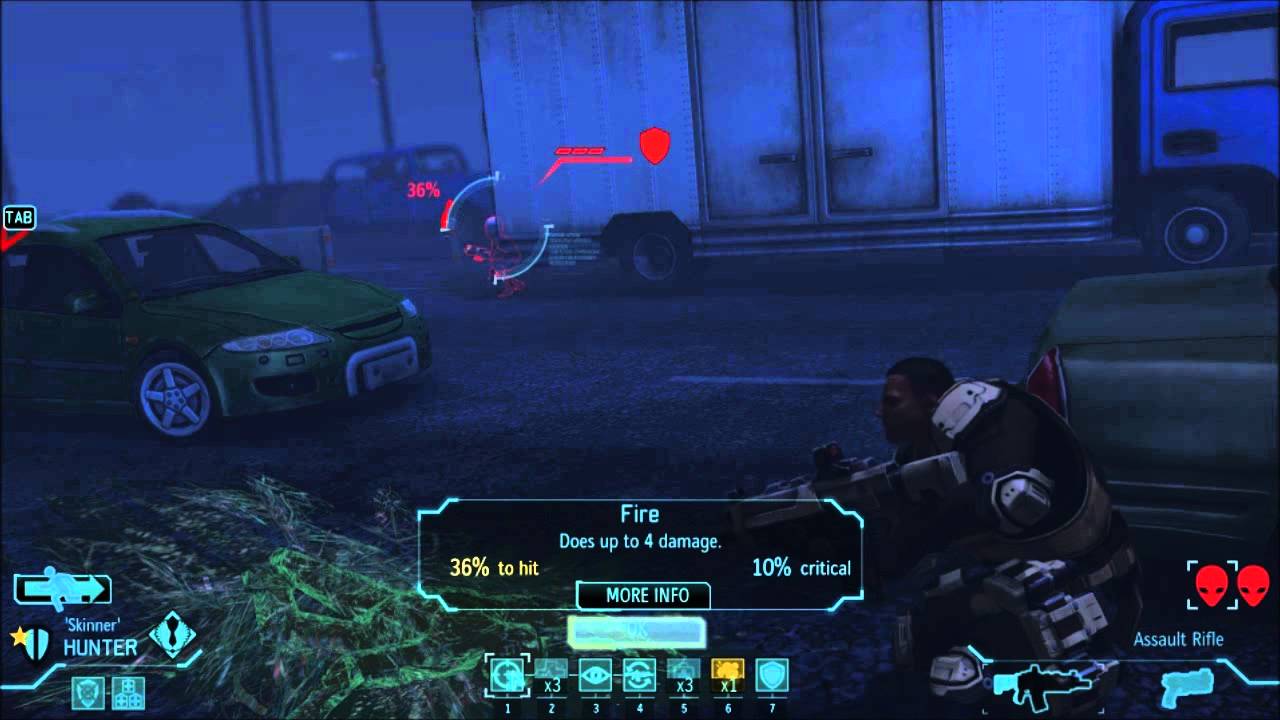
XCOM is a turn based tactical strategy game that focuses of positioning of your soldiers and tactics to defeat your enemy. Since it is a turn based game the structure of a turn is critical in making sure that the game is fun and balanced. In a standard turn each solder is given two actions that it can take. Actions mainly consist of moving, shooting and using skills. Soldiers have a set range that they can move with one action but you can also use two actions and move it twice the distance. You have to balance positioning and shooting while you are playing XCOM. Two actions per soldier per turn is the perfect number of turns and makes managing them important. There is also a cover system, that lets your soldier take cover to decrees the enemy’s chances of hitting you. There are two types of cover, partial and full cover. The two types of cover will affect the penalty to the enemy’s accuracy. These mechanics create the interesting gameplay that I have come to expect from an XCOM game.


Resources:
Besides XCOM being a great turn based strategy game it has its own organizational management where players have to manage the money, materials and human resources.  Players must manage the incoming money from supporting nations, to best equip your soldiers to fight the aliens. While you are getting money from supporting nations each month you must also manage relationships with each one of them. If a supporting nation is neglected in this regard then they will pull their support. With managing money and relations, you also have to manage resources that you find during missions such as enemy weapon fragments, Elerium, and the courses of dead aliens. You can use these resources with research or manufacturing to improve your fighting strength. The soldiers that you send off on missions are one of your most valuable resources. The more combat your soldiers have the more skilled and versatile they become. The difference between a recruit and a veteran is significant. Different soldiers different strengths while fighting. If you manage their strengths well then you will have a better squad as a result. The way you manage your resources greatly impacts your solder’s performance in the field and with that the way the game is played.


Game States:
There are a couple of game states that XCOM can be in. There are two main states base management and field combat. The combat state is where you have sent your soldiers off to a mission. While this state is going on you cannot manage your base until you finish the mission, retreat from the mission, or lose all of your solders. While you are in the combat state the game plays out like a turn based strategy game with each unit having two actions. This has been talked about above so it will not be covered again. If you are not in the combat state then you are in the base management state. While you are in this state you are at the XCOM HQ and will stay in this state until you pick a mission to undertake. In the managing state you can manage all of your resources as talked about in the resources section.


Sequencing:
In XCOM the combat state is handled in a turn based style. While you are in the combat state it will not change from a turn based style. When you have completed the combat state and change to the managing state the turn based style stays mostly the same. Instead of turns it is replaced with days and you can make as many actions as you want. As for order player actions there are order of events that must be completed inorder to unlock the next event. For example you must research something before you can start researching upgrades to it. Another example would be that you must research the technology in order to manufacture the technology.

Player Interaction:
XCOM is primarily a single player game and as such there is not a lot of player interaction. The most interaction that the player has is with the game system.


Theme and Setting:
XCOM is a humanity struggle game with everyone’s favorite… aliens! But with all seriousness it is one of thoughts first contact with aliens as they try to invade earth kind of games. This might not appeal to all players as the formula has been done countless number of times. To make the game successful it would have to do something to make it different from the standard formula. XCOM accomplished this with its detailed and in-depth combat system coupled with one of the best management system that I have seen in a long time. This is what draws the players in and then makes them interested in the story of the game.

Saturday, 16 November 2013

Object Oriented Design Patters

Object Oriented Design Patters
The time has come, I need to do another blog for my game engines course and I am not sure on a topic to talk about. For inspiration I opened up my game’s code and started to step back and look at it. While looking through my game code I relied that my game is made up of a bunch of different design patters. So this is my topic for this blog. It is time to get started.

Singleton Design Pattern
A singleton design pattern restricts the object to only have one instance. If there was singleton class called Singleton, then there can only be one instance of this object at any given time. You can think of a singleton similarly to a static variable. Just like a static variable there is only ever one instance of that object at a time. This is done by creating a class and making the constructor private. When the constructor is private you
can make sure that the user can’t call it multiple times.

ExampleClass *example = new ExampleClass();

Instead of creating a normal object like the example above we can use a function to get an instance of the object. An example singleton class is demonstrated below.


Singleton::getInstance(); // with the example below can also be called by SINGLETON_CORE


1:  // .h file----------------------------------------------------  
2:  // this macro can be used outside of the class to call on the instance  
3:  #define SINGLETON_CORE Singleton::getInstance();  
4:  class Singleton; // class prototype deceleration  
5:  typedef Singleton* (*FuncPtr) (void);  
6:  class Singleton{  
7:  public:  
8:       ~Singleton(); // default constructor  
9:       // the first time this is called it will also call createInstance to create the  
10:       // initial object and from then on it will call getInstance to return the instance pointer  
11:       static FuncPtr getInstance; // function to get the instance of the object  
12:  private:  
13:       Singleton();  
14:       static Singleton* createInstance(void);  
15:       static Singleton* instance; // static Object  
16:  };  
17:  // .cpp file--------------------------------------------------  
18:  // this makes sure that if the first time it is called that the instance is made  
19:  // if not then it will go ahead and create the instance and then return it  
20:  FuncPtr Singleton::getInstance = createInstance;  
21:  Singleton* Singleton::instance; // defining the static instance  
22:  Singleton::Singleton(){}  
23:  Singleton;:~Singleton(){}  
24:  Singleton* Singleton::createInstance(void){  
25:       if(instance == NULL){ // checking to see if there is no instance if there is not then make one  
26:            instance = new Singleton();  
27:            getInstance = Instance;  
28:       }  
29:       return m_instance;  
30:  }  
31:  Singleton* Singleton::Instance(void){  
32:       return m_instance;  
33:  }  

Singletons are great for objects that you only want one of. A great example of this is any sort of system manager. In my game we have an input manager that handles all of the inputs. You do not want multiple managers to control the input so we used the singleton design pattern. There are many other design patters that act like singletons as you only need one object of that type. The disadvantage of this pattern is that you cannot create multiple instances, but that is the entire point of the pattern. There can be problems with singletons and multiple threaded applications. If you are to have two threads use the create instance function at the same time they will both check and only one will get the instance. If you want a video that explains singleton design patterns well then check out this link. 

State Design Pattern

The state design pattern is an object oriented behavior based design pattern. It is also referred to the Objects for state pattern. This design pattern focuses on a base state class and then all other possible state that can happen inheriting from it. In a game context you can use the state design pattern for AI and the manager that will go along with it. AI can be broken down into a list of different behaviors that have been designed by the game designer. You can have a base class called behavior and all other behaviors will inherit from this base class. Behaviors such as seek, flee, and arrive can be behaviors that inherit from the base behavior class. In the AI manager you can decide what behavior to do at any point in time. To change what behavior you are currently running you just have to change the current behavior state to the correct one. An example of this would be as followed.

1:  class BehaviorState{  
2:  public:  
3:       virtual void doSomething();  
4:       virtual void ~BehaviorState();  
5:  };  
6:  class SeekBehavState public BehaviorState{  
7:       void doSomething(std::cout << "seeking" << std::endl);  
8:       // within this state you can change to other states  
9:  };  
10:  class FleeBehavState public BehaviorState{  
11:       void doSomething(std::cout << "fleeing" << std::endl);  
12:       // within this state you can change to other states  
13:  };  
14:  class AriveBehavState public BehaviorState{  
15:       void doSomething(std::cout << "arriving" << std::endl);  
16:       // within this state you can change to other states  
17:  };  
18:  // this class can be a singleton that handles all the AI or it can  
19:  // handle only one object it is up to your design  
20:  class Manager{   
21:       Manager();  
22:       // all of the different states  
23:       BehaviorState seekBehavior;  
24:       BehaviorState fleeBehavior;  
25:       BehaviorState ariveBehavior;  
26:       BehaviorState state;  
27:       void doSomething(){state.doStomething();}  
28:       BehaviorState getState(){return state;}  
29:       void setState(BehaviorState pstate){state = pstate;}  
30:       BehaviorState getSeekState(){return seekBehavior;}  
31:       BehaviorState getFleeState(){return fleeBehavior;}  
32:       BehaviorState getAriveState(){return ariveBehavior;}  
33:  };  
34:  int main(){  
35:       Manager m;  
36:       m.setState(getSeekState());  
37:       m.doSomething();  
38:       m.setState(getFleeState());  
39:       m.doSomething();  
40:       m.setState(getAriveState());  
41:  }  

If you would like more information about the state design pattern with a great example implementation, check out this link.

Façade Design Pattern

IIf you have ever done object oriented programing before then you have probably used the façade design pattern in some way before and did not know. A façade is an object that provides simple interface and functionality for larger blocks of code. An example of a façade is a third party library. It gives you all the functionality of the library without all of the background code. When you use the façade design pattern you make code more readable and understandable, organizes code for easier comprehension, and reduces the dependencies of outside code. A problem with the façade pattern is that the background code must be wrapped properly to be used to the fullest. If the wrapper is not adequate the entire façade will suffer. Here is what the façade pattern looks like in a UML diagram.


If you would like more information on the façade pattern along with example implementation, check out this link. 

Factory Design Pattern

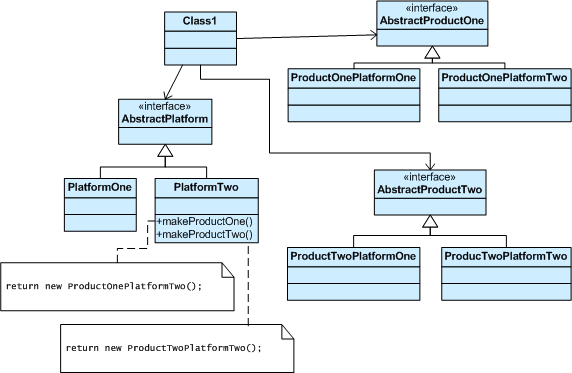
The Factory design pattern is used when you want a function to return one of several classes which all have one base/super class. An example where this would come in handy would be for spawning entities in your game. You have a base class called GameObject which all other game objects will inherit from. All of your enemy classes will inherit from the game object class, bullets, scenery, items you name it the factory will be able to spawn it. The object that is returned is chosen at runtime and is not pre-computed. This means that you can spawn enemies and items on the fly. Here is a UML design of a factory.


If you would like more information about the factory design pattern and an example implementation, check out this link.

If you want a playlist of videos that goes through a lot of object oriented programing design patterns then check out this link to be taken to a Youtube playlist. 

Thursday, 14 November 2013

Cameras In Games, Time for a Refresher

I was recently working on my game and I implemented a camera manager to handle everything that has to do with the camera in my game. My game is a top down shooter so I only have one camera. We were finalizing what our first level was going to look like and I had to change the camera to fit the new proportions. My camera was working fine and I thought that everything was ok, I was wrong. When I adjusted the camera I quickly found that my camera logic was flawed. The game was stretched and disproportional and the player was in the bottom of the screen. It seems that I am rusty on how cameras work. Time to re-educate!


The first thing I need to get all squared out is what defines a camera? To me a camera in a game is the viewport that is shown to the user. It is like the user is looking through the lens of the camera at the virtual world. I still have the definition right at least in my camera logic so I can check that off my list of possible errors. Ok now that I have the definition down I have to get the different types of camera down.

Perspective cameras are cameras that maintain and display perspective. Perspective is displaying three dimensional objects on a two dimensional surface. It tries to keep proportions correct in relation to other objects. You can see in the railway track picture that they railway goes to a point the farther it is away from the camera. So is a perspective camera set up? A perspective is made up of a viewing frustum, near and far clipping planes and a field of view. The picture below demonstrates how all these components are configured. The view frustum is defined by the bounds of the near and far clipping planes. The near clipping plane is smaller than the far clipping plane so this makes the objects seem bigger the closer they get to the camera. This mirrors how things in the real world work. Any objects within the view frustum, near and far clipping planes will be visible to the camera; everything else will be out of the camera view. My camera is not a perspective camera so some of the camera logic does not apply to me so let’s check out the other camera.


An orthographic camera does not have a frustum and therefor does not display perspective. Instead of objects getting smaller the further it gets from the camera there is no change in the orthographic camera. Instead of a frustum the camera has a box with left, right, top, and bottom bounds. With a box instead of a frustum there is no perspective anymore. This is great for top down games like ours and this is the camera that we are using.


Now that I have been reminded about how the orthographic camera works my problem would be that I was trying to move the camera forward to zoom in the camera. This does not work because moving it closer to the camera does not change its size. Instead I need to change the size of my box to make it smaller in order to make the player bigger. Now that I have that figured out let’s keep going and think about how games handle cameras.


Fixed Camera

Every time I think about camera now I think about God of War as this is my professors go to for everything involving cameras. Now I have never played the games as I never owned a PlayStation anything before, but from the countless gameplay footage that I have seen in class I can now talk about its camera with some knowledge and I have to say that yes it does have a great camera system. Everything that has to do with the camera is smooth and seamless. All the camera shots in the cut scenes look like block buster shots. So how do they do it? To set up something like that would not be too hard to do in a 3D modeling program like Maya. All of the cut scenes can be done with Maya to control the camera shots better and more effectively. You can set up locators in the scene that have a position and orientation. If you have enough of them you can interpolate between them and have an effective camera system. You can also set a path or a rail that the camera can follow to control the camera that way.


Dynamic Cameras

Fixed cameras are much easier to setup and implement than dynamic camera as there is a lot more logic that has to go in to make a dynamic camera good. A camera is the window to your game world and as such they greatly affect the feel and playability of the game. There have been a lot of games that implement dynamic camera and decrease the playability and the overall feel of the game. That is why dynamic cameras are much more meticulous to implement. Then there are easier cameras to implement like the first person camera that lets you take the perspective of a character in a game. This one is easy to implement and code but there are others that can make or break a game.
The third person camera is one of these cameras that can make or break a game as a good implementation can add to the game’s experience. If it is not done correctly then it can severely hinder the game’s playability and overall experience. Clipping  and colliding with objects and obstacles are a big concern with third person cameras. There is a time in every gamer’s carrier where they have been near a wall and the camera clips or goes into the wall. When this happens it takes away from the game world and shows the games ugly side that is support to be covered up. One way to reduce this from happening is to have different types of camera and choose the right camera for the right occasion. Each camera can have a different weighting and blending different types of camera could help avoid this problem.

Anyway that are some thoughts about camera now that I have talked about camera time to go and fix mine!

Monday, 11 November 2013

Spawning in Games My Game Implementation

I was recently looking at and implementing spawning in my GDW game and though that I would write a blog on my thoughts and implementation. Spawning is when a something in the game is created. It refers to the live creation of something in the game world. This entity can be a live creature or an object it does not matter. When I first started to work with implementing my spawning system I looked to factories to do this for me. But what is a factory?

Factory
The Factory design pattern is one solution for creating objects.  The factory design pattern works well to return one of several classes that share one base class. For example you want to spawn a random enemy at a random point in time. Each enemy has it's own class structure, but they all inherit from the base class GameObject. You have a random number generator and a number that corresponds to each type of enemy. You can send the information to the factory and it will return a newly created enemy of that type specified. This will work as long as each class has the same base class. This brings us to one of the limitations of factories. Each object that a factory can make must have the same base class. Another limitation come when refactoring is attempted. When refactoring an existing class to use factories it will break all other existing clients. A client is the user or anything that can use the class. If you want more information about the factory design pattern I would suggest watching this video.

Once I started to implement a factory I relised that what I was doing was redundant. I am using Ogre and Havok to make my game and they have a list of everything in the scene. Before to make entities I was using that list to make an instance of an object and then add it to the scene. I relised that Ogre and Havok were already factories in a sense. I can use Ogre and Havok to make instances of models and then add these instances to the scene. There I had my makeshift factory.

Now once I had creating models done I started work on where to place them and came up with this solution. In Maya you can create locators that when you export to an fbx file can be called in code to get positions. This way I can set the bounds of my level with these locators. I can read in the bounds of the level and then divide it into chunks. Our game is a wave based game so enemies cant spawn in chunks that are to close to the player.  Within these chunks I can generate a random location and then spawn an entity there. I took this idea and made spawn chunks with this functionality. This is what the class looked like.


 class SpawnChunk{  
 public:  
      SpawnChunk(Ogre::Vector3 min, Ogre::Vector3 max);  
      // pick a random point in the chunk to spawn an entiry  
      Ogre::Vector3 generateRandomPosition(Real yVal);  
      void renderChunk(Ogre::SceneManager *sceneManager);  
 private:  
      // these are the bounds of the spawnchunk with the min point and  
      // the max point  
      /*        --------* max  
                -       -  
                -       -  
           min  *-------- */  
      Ogre::Vector3 m_min;  
      Ogre::Vector3 m_max;  
      Real generateNumberRange(Real one, Real two);  
 };  

Once I had that I took the bounds of the level and divided it up into a number that was passed in. To divide the level up I took the min and max bounds of the level and created a box. From there I took the length of the side of the box and divieded it by the number of sections. Then creating a list of spawn chunks from there. The code looked like this.

 Real l_divLengthX = (m_bmax.x - m_bmin.x) / (float)p_times;  
      Real l_divLengthZ = (m_bmax.z - m_bmin.z) / (float)p_times;  
      Ogre::Vector3 l_tempMin(0,0,0);  
      Ogre::Vector3 l_tempMax(0,0,0);  
      for(int i = 0; i < p_times; ++i){ // looping through in the x dir       
           for(int j = 0; j < p_times; ++j){ // looping through in the z dir            
                l_tempMin.x = m_bmin.x + (l_divLengthX * (float)i) ;  
                l_tempMin.z = m_bmin.z + (l_divLengthZ * (float)j) ;  
                l_tempMax.x = m_bmin.x + (l_divLengthX * ((float)i + 1.0));  
                l_tempMax.z = m_bmin.z + (l_divLengthZ * ((float)j + 1.0));  
                m_spawnChunkList.push_back(SpawnChunk( l_tempMin, l_tempMax ));  
           }  
      }  

Once I had a list of spawn chunks I was finished. Now I just have to add wave based spawning and our game will start to have some gameplay, wOOt!


Sunday, 10 November 2013

AI in the Insomniac Engine


It makes sense that AI is plays a big part of game. Gameplay heavily relies on enemies and the AI that controls them. With a pool of behaviors to draw from and a handler to choose the correct behavior to use can create the illusion of an enemy with intelligence. Some games forget the intelligence part of AI. With enemies that are blind, to friendly NPC running into a horde of enemies guns blazing and drawing all of the fire. Sometimes they die and sometimes they are curtail for the story to progress and become a damage soak and never die.

In a lecture we watched a talk presented by Insomniac's Reddy Sambavaram (at GDC11) about the AI in the Insomniac engine and I have to say that it peaked my interest. What caught my attention the most was the way that they looked at navigation and interesting ways to improve it. If you are interested there is a link that will take you to the slides that were used in the presentation.


The term navigation is used when you are describing how a given NPC moves through terrain on a movement path. The NPC is at its current position A, and has set a destination that is has to reach B. Now it has to compute the short path to reach its destination. The shortest path to its destination is straight but there are not many times where that is possible as there will be something in the way. This is where a bunch of different path finding algorithms is used to compute the shortest and safest path to its destination. One of the more famous algorithm is called A Star (A*). This algorithm is one of the more widely used and is a great way to determine a path.


There are others methods of finding paths such as Insomniac’s approach that they took with Ratchet and Clank: Deadlocked. For the navigation system in that game they used way-volume representation. These way-volume were hand made by the designers using volumes and nodes to help with an A* path. There were connections made between the volumes to help guide NPC between them. In the presentation slides this is illustrated in slide six. Once Insomniac moved on to the Playstation3 they started to change their workflow and started to introduce Navigation Meshes to the process.
Resistance: Fall of Man was one of the first games that used nav-meshes. The designers built the mesh in Maya. The polys were used as nodes in the A* algorithm. There was a problem with the early implementation of the mesh as it took too much for the PPU (physics processing unit) to handle. This is why that they could only use eight navigating NPC with the system. They know that they had a lot of tweaking to do. For Resistance 2 they set some goals to improve the navigation system and make sure that it was more usable. To fix some of their issue they tried a number of different solutions such as portioning the meshed and triangulating the mesh’s polys. They added Bezier curves to help make the paths smooth and help with corners. They also added more advanced obstacle avoidance. We have been talking about navigation meshes but what are they?


A navigation mesh or nav-mesh is an abstract mesh used in AI to aid path finding in large spaces. How does a nav-mesh work? The A* algorithm uses waypoints or nodes to compute its path. With the nav mesh each poly is a node that the NPC can use to navigate to. Insomniac decided to only dedicate 10% of its navigation bugged for the A* algorithm so they spent a lot of time on optimization. They accomplished this by cashing paths for reusability, flagging walls of tangents of the path, and gathering nearest boundaries for obstacles.
Insomniac also created an automatic tool to generate navigation meshes instead of making them by hand. This freed up also of time in the development stage as designers did not have to go through the terrain and create the nav-mesh by hand. The tool is not perfect but it is easier to fix one or two errors then to make the entire mesh by hand. Insomniac also added functionality to jump up, down, or over objects with jump nodes. If there was a ledge there would be hard for path finding to jump over terrain.

I find solutions to problems interesting as they are usually innovative and inspiring. Finding creative solutions to the problems that games face is how the industry has grown so rapidly in the sort time span. Trying to squeeze everything you can get from the hardware that you are given is interesting to say the least. Creating a mesh that you can use to make A* more efficient is a cool solution to a tough problem.

Thursday, 7 November 2013

Game Engines...What Are They?

So I have been taking the course "Game Engine Design and Implementation" for about two and a bit months. At the start of the course the question brought up at the beginning was what is a "Game Engine". When I first heard the question I had an idea about the answer but I was not 100% sure about it. My first thought was that a game engine is a base that makes a game run. Now this is partialy right but not quite there. This is why I initialize thought this.


I am in my third year of Game Development and throughout the program I have been making games with my own code that  wrote. I used some third party libraries, but it was mainly my code that made the game work. For example my second year game I used OpenGL and glut to make a game. I had to write code to make and handle: creating a window, rendering frames, updating the game, getting input from the user and things like that.  The code that I was writing was not a game engine but more of a framework. I created a framework that I could use to make a game with gameplay.

So I have been working with frameworks but not full blown engines. So what am I working with this year? Well I am working with a Ogre a rendering engine and Havok a physics engine. Ogre and Havok are called engines, so what makes them engines? Well, Object Oriented Graphical Rendering Engine or OGRE is a scene based, 3D engine that can render in both OpenGL and DirectX. It handles everything having to do with rendering to the screen. Can you make games with just Ogre? The answer is no but you can use it for the rendering part of your game. The same with Havok.

So what is a "Game Engine"? A game engine is a system designed to create and develop games. Game engines are build to run games. There could be a lot of libraries and other components that are all wrapped by the encompassing engine. A engine has to be able to manage data, co-ordinate date with other systems, render, have user input, some way to update entities on screen. The definition of a game engine is not strict as there is not a real strict definition. So yes you can say that a game engine is the bases that makes a game run.

Thursday, 17 October 2013

Grinding Digital Prototype Feature Treatment

The basis of the blog comes from the blackboard quest guide. If you were to design a digital game prototype for your GDW, what concerns do you have about the gameplay, aesthetics, kinaesthetic, or technology in your original concept? Of these concerns, which is the highest priority? Which will kill the game if they don’t work? Write it up in your blog and decide where to focus your efforts for your digital GDW prototype.

In my game development workshop (GDW) I am currently the lead programmer in Any Key Entertainment. our original game concept for this years game came in the form of a genera of games. We wanted to make a twin stick shooter with waves of enemies. The closest game to this would be geometry wars. The game is an arcade, twin stick bullet hell, survival game set in space. The levels and enemies will be wave bases instead of continuous spawning. To make sure that the game is appealing to players we are focusing on gameplay as our models and colour scheme is simple. We want to make the gameplay interesting and entertaining to the player while adding ease of use with controls and menu systems. With this genera of games, tight controls and fluid gameplay will make or break the game. This is our main focus for out game.

The highest priority for the technical side of the game is making sure that the controls are as tight as possible and makes the game easy to play. With this game controls are king, so we want to make sure that there is every style of controls so that the player can chose the most comfortable one for them. With this stated we want to add support for controllers, keyboard and mouse and keyboard. There is a technical challenge here to make sure that all the controls play the same so you get the same experience no matter what style you play. Also on th e technical side we have to make sure that we have good hit detection as without it the feel of the game would decrease significantly. As our engine support Havok rigid bodies we will be making sure that we utilize them properly to make sure that the gameplay does not suffer. Finally making sure that there are different enemies and different enemy behaviors to make sure that the game does not get stale to quickly. Some enemies will try and flank you others will try and dodge you bullets. Adding different enemy AI will make sure that the gameplay is unique and exciting.

On the aesthetics  aspect of the game for a prototype this is not a concern as we can add "makeup" to the game later and make it look pretty. If the game does not handle and play well the the base for the game is not up to snuff. Our prototype will show off the games playability and gameplay mechanics and not the  aesthetics  of the game. On final release of the game the "makeup" will be applied and the game will be ready for a night on the town.

For kinaesthetics, controls takes center stage again. I can not harp on how important out controls are to our game, as a game that does not feel right and flow well will not be fun to play. We are calling this game a twin stick shooter so of course there has to be support for a controller for movement and aiming. As for implementing all controls that will fall to the input manager to make sure no matter what controls you use they will still do the game result.

There is one giant concern for this game prototype and that is making sure that the gameplay flows well and handles well. Gameplay is the word that best describes the game if it is not up to snuff then I feel the overall game will suffer.